


简介
在项目开发中,我们经常会用到自定义组件,此处分享一下HarmonyOS中JS如何利用canvas实现自定义组件之可拖拽圆形进度条。
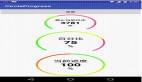
效果演示
实现思路
官方文档:JS API参考-HarmonyOS应用开发
思路参考: 可拖拽圆形进度条组件(支持移动端))
这里并未采用官方文档说通过element引入到宿主页面的方式;
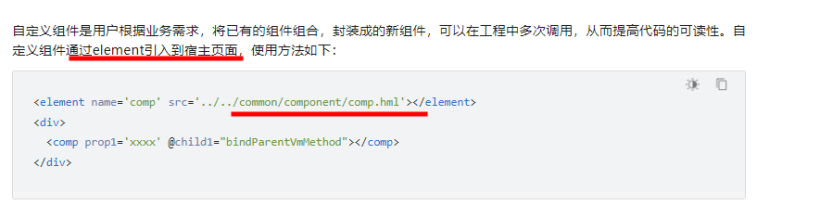
采用上述过程发了bug:canvas首次渲染绘制的不显示;
解决方案: 在页面生命周期onShow的时候,通过js让canvas绘制一次;
- onShow() {
- // Todo 绘制
- }
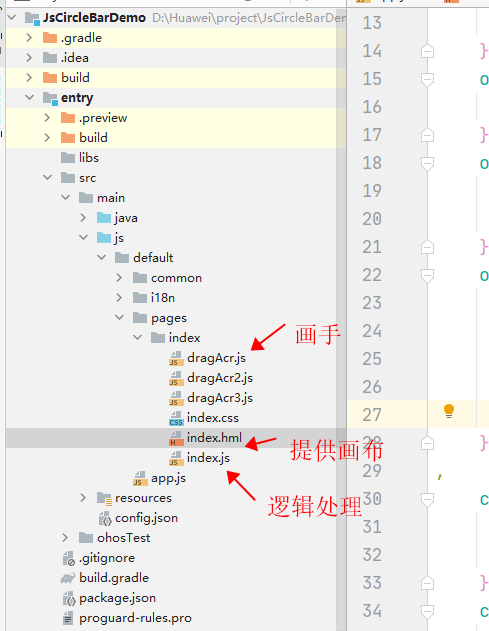
1.项目结构
2.DragAcr初始化
定义构造函数,声明绘制圆的参数;
- export default class DragAcr {
- constructor(param) {
- this.initParam(param)
- this.draw(this.value)
- }
- initParam(param) {
- const {
- el,
- startAngle = 0,
- endAngle = 2,
- width = 252,
- innerColor = "red",
- outColor = "#08000000",
- innerLineWidth = 1,
- outLineWidth = 24,
- counterclockwise = false,
- slider = 8,
- color = ["#ffffff", "#0F75F3", "#54C8A5", "#FEDB00", "red"],
- sliderColor = "#ffffff",
- sliderBorderColor = "blue",
- value = 0,
- change = (v) => {
- console.log(v)
- },
- textShow = true,
- } = param;
- this.el = el;
- this.width = width;
- this.height = width;
- this.center = this.width / 2
- this.outLineWidth = outLineWidth;
- this.radius = this.width / 2 - this.outLineWidth / 2;
- // this.ctx = el.getContext("2d");
- this.ctx = this.el.getContext('2d', {
- antialias: true
- });
- this.startAngle = startAngle;
- this.endAngle = endAngle;
- this.innerColor = innerColor;
- this.outColor = outColor;
- this.innerLineWidth = innerLineWidth;
- this.counterclockwise = counterclockwise;
- this.slider = slider;
- this.color = color;
- this.sliderColor = sliderColor;
- this.sliderBorderColor = sliderBorderColor;
- this.value = value;
- this.textShow = textShow;
- this.change = change;
- this.isDown = false;
- }
3.DragAcr绘制
canvas的API参考:canvas组件-画布组件
根据当前进度 分段式的绘制需要的各个小控件;
- // 绘图
- draw(value) {
- console.log(TAG + ';draw value:' + value);
- if (value == undefined) {
- value = this.value;
- } else {
- this.value = value;
- }
- this.ctx.clearRect(0, 0, this.width, this.width);
- this.ctx.save();
- let startDeg = this.counterclockwise ? Math.PI * (2 - this.startAngle) : Math.PI * this.startAngle
- let endDeg = this.counterclockwise ? Math.PI * (2 - this.endAngle) : Math.PI * this.endAngle
- // 绘制背景圆
- this.ctx.beginPath();
- this.ctx.arc(this.center, this.center, this.radius, startDeg,
- endDeg, this.counterclockwise);
- this.ctx.strokeStyle = this.outColor;
- this.ctx.lineCap = "round";
- this.ctx.lineWidth = this.outLineWidth;
- this.ctx.stroke();
- let Deg = this.valToDeg(value)
- this.drawOne(startDeg, value);
- if (value > 25) {
- // 绘制可变圆弧
- this.drawTwo(value);
- }
- if (value > 50) {
- // 绘制可变圆弧
- this.drawThree(value);
- }
- if (value > 75) {
- this.drawFour(value)
- }
- // 绘制滑块bar
- this.P = this.DegToXY(Deg)
- this.ctx.beginPath();
- this.ctx.moveTo(this.center, this.center,);
- this.ctx.arc(this.P.x, this.P.y, this.outLineWidth / 2, 0, Math.PI * 2, false); // 绘制滑块内侧
- this.ctx.fillStyle = this.sliderBorderColor;
- this.ctx.fill();
- this.ctx.beginPath();
- this.ctx.moveTo(this.center, this.center);
- this.ctx.arc(this.P.x, this.P.y, this.slider, 0, Math.PI * 2, false); // 绘制滑块
- this.ctx.fillStyle = this.sliderColor;
- this.ctx.fill();
- // 文字
- if (this.textShow) {
- this.ctx.font = '60px HarmonyHeiTi, HarmonyHeiTi-Medium';
- this.ctx.fillStyle = "#000000";
- this.ctx.textAlign = "center"
- this.ctx.textBaseline = "middle";
- this.ctx.fillText(this.value + "", this.center, this.center);
- }
- // this.drawLine();
- }
4.DragAcr手势监听
手势按下,手势移动,手势抬起的事件处理
- OnMouseMove(evt) {
- if (!this.isDown) return;
- let evpoint = {};
- evpoint.x = this.getx(evt);
- evpoint.y = this.gety(evt);
- let point = this.spotchangeXY(evpoint);
- let deg = this.XYToDeg(point.x, point.y);
- // console.log(TAG + '; OnMouseMove deg XYToDeg ...' + deg);
- deg = this.counterclockwise ? deg : Math.PI * 2 - deg;
- // console.log(TAG + '; OnMouseMove deg...' + deg);
- let val = (deg / Math.PI - this.startAngle) / (this.endAngle - this.startAngle) * 100
- val = Math.round(val)
- // console.log(TAG + '; OnMouseMove val:' + val);
- if (val < 0) val = 100 + val;
- if (val <= 0) val = 0;
- if (val > 100) {
- if (this.value > 75) {
- val = 100;
- } else {
- val = val - 100;
- }
- }
- if (val > 75) {
- if (this.value < 25) {
- val = 0;
- }
- }
- // console.log(TAG + '; OnMouseMove val2:' + val);
- if (Math.abs(val - this.value) > 10) return;
- // console.log(TAG + '; OnMouseMove val:' + val);
- this.animate = requestAnimationFrame(this.draw.bind(this, val));
- if (this.value != Math.round(val)) {
- this.value = Math.round(val);
- this.change(this.value)
- }
- // console.log(TAG + '; OnMouseMove end...');
- }
- OnMouseDown(evt) {
- let range = 10;
- let X = this.getx(evt);
- let Y = this.gety(evt);
- let P = this.P
- let minX = P.x - this.slider - range;
- let maxX = P.x + this.slider + range;
- let minY = P.y - this.slider - range;
- let maxY = P.y + this.slider + range;
- if (minX < X && X < maxX && minY < Y && Y < maxY) { //判断鼠标是否在滑块上
- this.isDown = true;
- } else {
- this.isDown = false;
- }
- console.log(TAG + 'OnMouseDown end...');
- }
- OnMouseUp() { //鼠标释放
- const _this = this
- cancelAnimationFrame(_this.animate);
- this.isDown = false
- console.log(TAG + 'OnMouseUp end...');
- }
5.使用方法
- index.hml文件
- <div class="container">
- <canvas ref="canvas2"
- style="width : 252px; height : 252px;"
- @touchstart="canvasTouchStart"
- on:touchmove="canvasTouchMove"
- on:touchend="canvasTouchEnd"></canvas>
- </div>
- index.js文件
- import DragAcr2 from './dragAcr2.js'
- export default {
- dragAcr2: undefined
- data: {
- // 出事化值
- reverb2: 30,
- }
- onShow() {
- // 首次绘制
- this.initDragAcr2();
- },
- // 触摸事件
- canvasTouchStart(msg) {
- //console.log('dragAcr canvasTouchStart msg:' + msg);
- this.dragAcr2.OnMouseDown(msg);
- },
- canvasTouchMove(msg) {
- //console.log('dragAcr OnMouseMove msg:' + msg);
- this.dragAcr2.OnMouseMove(msg);
- },
- canvasTouchEnd(msg) {
- // console.log('dragAcr canvasTouchEnd msg:' + msg);
- this.dragAcr2.OnMouseUp(msg);
- },
- initDragAcr2() {
- const el = this.$refs.canvas2;
- if (this.dragAcr2 == undefined) {
- this.dragAcr2 = new DragAcr2({
- el: el,
- value: this.reverb2,
- change: (v) => {
- console.log(`value:${v}`)
- }
- })
- }
- }
- }
总结
1,目前在API6及一下手机,canvas绘制时会是屏幕闪烁(API7远程模式无此现象);
2,无论什么语言,思路都是大体相同,绘制,手势,事件分发等。