


Linkerd 是 Kubernetes 的服务网格。它通过为您提供运行时调试(runtime debugging)、可观察性(observability)、可靠性(reliability)和安全性(security),使运行服务更轻松、更安全 — 所有这些都不需要对您的代码进行任何更改。
服务网格是用于处理服务间通信的专用基础设施层。它负责通过包含现代云原生应用程序的复杂服务拓扑来可靠地传递请求。实际上,服务网格通常通过一组轻量级网络代理来实现,这些代理与应用程序代码一起部署,而不需要感知应用程序本身。— Willian Morgan Buoyant CEO
为什么我们需要 Service Mesh?
1.What's a service mesh? And why do I need one? 一文中做了详细的解释,这里不再赘述。拥抱云原生,微服务已进入 Service Mesh 时代。
https://buoyant.io/2020/10/12/what-is-a-service-mesh/
为什么折腾 Linkerd2 而不是 Istio?
2.Benchmarking Linkerd and Istio
https://linkerd.io/2021/05/27/linkerd-vs-istio-benchmarks/
部署环境
- 腾讯云 TKE K8S 集群(或你自建的私有 K8S 集群)
- CentOS 7.x
可先快速过一个官方上手教程,本文是基于此在腾讯云的实战详解。
- 快速上手 Linkerd v2 Service Mesh(服务网格)
- Getting Started
https://linkerd.io/2.10/getting-started
查看集群版本
kubectl version --short
- Client Version: v1.16.9
- Server Version: v1.16.9
Linkerd2 CLI 安装
首先我们需要下载并安装最新版本的 linkerd CLI。
我们直接进入 Linkerd2 版本发行页面,查看最新版:
https://github.com/linkerd/linkerd2/releases/
这里我们下载 linkerd2-cli-edge-21.6.1-linux-amd64。
https://github.com/linkerd/linkerd2/releases/download/edge-21.6.1/linkerd2-cli-edge-21.6.1-linux-amd64
安装:
- wget -c https://github.com/linkerd/linkerd2/releases/download/edge-21.6.1/linkerd2-cli-edge-21.6.1-linux-amd64
- mv linkerd2-cli-edge-21.6.1-linux-amd64 /usr/local/bin/linkerd
- chmod 755 /usr/local/bin/linkerd
现在我们运行 linkerd,会看到如下信息:
- Usage:
- linkerd [command]
- Available Commands:
- check Check the Linkerd installation for potential problems
- completion Output shell completion code for the specified shell (bash, zsh or fish)
- diagnostics Commands used to diagnose Linkerd components
- help Help about any command
- identity Display the certificate(s) of one or more selected pod(s)
- inject Add the Linkerd proxy to a Kubernetes config
- install Output Kubernetes configs to install Linkerd
- install-cni Output Kubernetes configs to install Linkerd CNI
- jaeger jaeger manages the jaeger extension of Linkerd service mesh
- multicluster Manages the multicluster setup for Linkerd
- profile Output service profile config for Kubernetes
- repair Output the secret/linkerd-config-overrides resource if it has been deleted
- uninject Remove the Linkerd proxy from a Kubernetes config
- uninstall Output Kubernetes resources to uninstall Linkerd control plane
- upgrade Output Kubernetes configs to upgrade an existing Linkerd control plane
- version Print the client and server version information
- viz viz manages the linkerd-viz extension of Linkerd service mesh
- Flags:
- --api-addr string Override kubeconfig and communicate directly with the control plane at host:port (mostly for testing)
- --as string Username to impersonate for Kubernetes operations
- --as-group stringArray Group to impersonate for Kubernetes operations
- --cni-namespace string Namespace in which the Linkerd CNI plugin is installed (default "linkerd-cni")
- --context string Name of the kubeconfig context to use
- -h, --help help for linkerd
- --kubeconfig string Path to the kubeconfig file to use for CLI requests
- -L, --linkerd-namespace string Namespace in which Linkerd is installed ($LINKERD_NAMESPACE) (default "linkerd")
- --verbose Turn on debug logging
- Additional help topics:
- linkerd alpha experimental subcommands for Linkerd
- Use "linkerd [command] --help" for more information about a command.
安装 Linkerd2 控制平面
首先,我们需要验证下集群,使用 linkerd check --pre,正常会输出如下信息:
- Linkerd core checks
- ===================
- kubernetes-api
- --------------
- √ can initialize the client
- √ can query the Kubernetes API
- kubernetes-version
- ------------------
- √ is running the minimum Kubernetes API version
- √ is running the minimum kubectl version
- pre-kubernetes-setup
- --------------------
- √ control plane namespace does not already exist
- √ can create non-namespaced resources
- √ can create ServiceAccounts
- √ can create Services
- √ can create Deployments
- √ can create CronJobs
- √ can create ConfigMaps
- √ can create Secrets
- √ can read Secrets
- √ can read extension-apiserver-authentication configmap
- √ no clock skew detected
- pre-kubernetes-capability
- -------------------------
- √ has NET_ADMIN capability
- √ has NET_RAW capability
- linkerd-version
- ---------------
- √ can determine the latest version
- √ cli is up-to-date
- Status check results are √
部署控制平面:
- linkerd install | kubectl apply -f -
查看 linkerd 命名空间的 pod 部署情况:
- kubectl get po -n linkerd
- NAME READY STATUS RESTARTS AGE
- linkerd-destination-6c6bf4fc4-282gd 3/3 Running 0 5m
- linkerd-identity-7cd9998969-cvzc8 2/2 Running 0 5m
- linkerd-proxy-injector-855b9b6747-r8pcz 2/2 Running 0 5m
同样,我们使用 linkerd check 检查一下。
ok, 接下来我们部署一些常用的扩展,增强我们控制平面的功能。
安装 Linkerd2 控制平面常用扩展
grafana,prometheus,jaeger 等的部署(针对 Linkerd 2 的相关指标)
使用如下命令:
- linkerd viz install | kubectl apply -f - # on-cluster metrics stack
- kubectl get po -n linkerd-viz #审查 namespace, 直到所 pod 都 ready
- # grafana-5659477d88-txq5b 0/2 PodInitializing 0 14m
- # metrics-api-6fcb849dc-k9sw5 2/2 Running 0 14m
- # prometheus-798d8d4698-4x8h2 2/2 Running 0 14m
- # tap-f5984d7f7-fkpf9 0/2 PodInitializing 0 14m
- # tap-injector-6b455dd64b-2c82n 0/2 PodInitializing 0 14m
- # web-657dbffb8f-7d2gr 0/2 PodInitializing 0 14m
如果出现某一个 pod 出现错误,我们可以通过 kubectl describe po 来获取详细错误信息,如:
- kubectl describe po grafana-5659477d88-txq5b -n linkerd-viz
比如说,我这里如下镜像就被卡住了(腾讯云):
- cr.l5d.io/linkerd/grafana:edge-21.6.1
- cr.l5d.io/linkerd/tap:edge-21.6.1
- cr.l5d.io/linkerd/web:edge-21.6.1
大家可以(科学上网)手动拉取。
同样,我们再部署两个可选的扩展。
部署 jaeger:
- ## optional
- linkerd jaeger install | kubectl apply -f - # Jaeger collector and UI
- kubectl get po -n linkerd-jaeger #审查 namespace
- # OR:
- # docker pull cr.l5d.io/linkerd/jaeger-webhook:edge-21.6.1
- # docker pull jaegertracing/all-in-one:1.19.2
部署 multicluster:
- linkerd multicluster install | kubectl apply -f - # multi-cluster components
- kubectl get po -n linkerd-multicluster
- # 果然报错了
- linkerd-gateway-bcb5888c5-ws6wz 1/2 ErrImagePull 0 21s
查看报错信息:
- kubectl describe po linkerd-gateway-bcb5888c5-ws6wz -n linkerd-multicluster
- # Normal BackOff 21s (x5 over 2m13s) kubelet, k8s-master-01 Back-off pulling image "gcr.io/google_containers/pause"
- # Warning Failed 21s (x5 over 2m13s) kubelet, k8s-master-01 Error: ImagePullBackOff
很明显(gcr.io/google_containers/pause),我们需要科学上网(具体怎么做,太多教程了,这里不讨论)。
还有一个问题比较棘手的是,这里即使 gcr.io/google_containers/pause 已经存在于本地,部署时还是回去 gcr.io 拉取。
所以,下面提供另一种方式来弄(没连外网的情况下)。
使用 kustomize 解决 linkerd-gateway (腾讯云部署)不成功的问题
kustomize 如何安装,大家自行查看 https://kustomize.io。
首先,导出 linkerd multicluster 部署 yaml 档。
- linkerd multicluster install > linkerd-multicluster.yaml
然后,我们给它打个补丁patch-linkerd-multicluster.yaml:
- apiVersion: apps/v1
- kind: Deployment
- metadata:
- annotations:
- linkerd.io/created-by: linkerd/cli edge-21.6.1
- labels:
- app.kubernetes.io/name: gateway
- app.kubernetes.io/part-of: Linkerd
- app.kubernetes.io/version: edge-21.6.1
- linkerd.io/control-plane-component: gateway
- app: linkerd-gateway
- linkerd.io/extension: multicluster
- name: linkerd-gateway
- namespace: linkerd-multicluster
- spec:
- replicas: 1
- selector:
- matchLabels:
- app: linkerd-gateway
- template:
- metadata:
- annotations:
- linkerd.io/created-by: linkerd/cli edge-21.6.1
- linkerd.io/inject: enabled
- config.linkerd.io/proxy-require-identity-inbound-ports: "4191,4143"
- config.linkerd.io/enable-gateway: "true"
- labels:
- app: linkerd-gateway
- spec:
- containers:
- - name: pause
- image: ccr.ccs.tencentyun.com/cloud-native/google-pause
- serviceAccountName: linkerd-gateway
ccr.ccs.tencentyun.com/cloud-native/google-pause,这是笔者上传到腾讯云的公开镜像。
新建 kustomization.yaml:
- resources:
- - linkerd-multicluster.yaml
- patchesStrategicMerge:
- - patch-linkerd-multicluster.yaml
使用 kustomize 重新部署:
- kustomize build . | kubectl apply -f -
重新查看一下:
- kubectl get po -n linkerd-multicluster
- # linkerd-gateway-6c8dc7bb49-6tghc 2/2 Running 0 92s
完美解决。
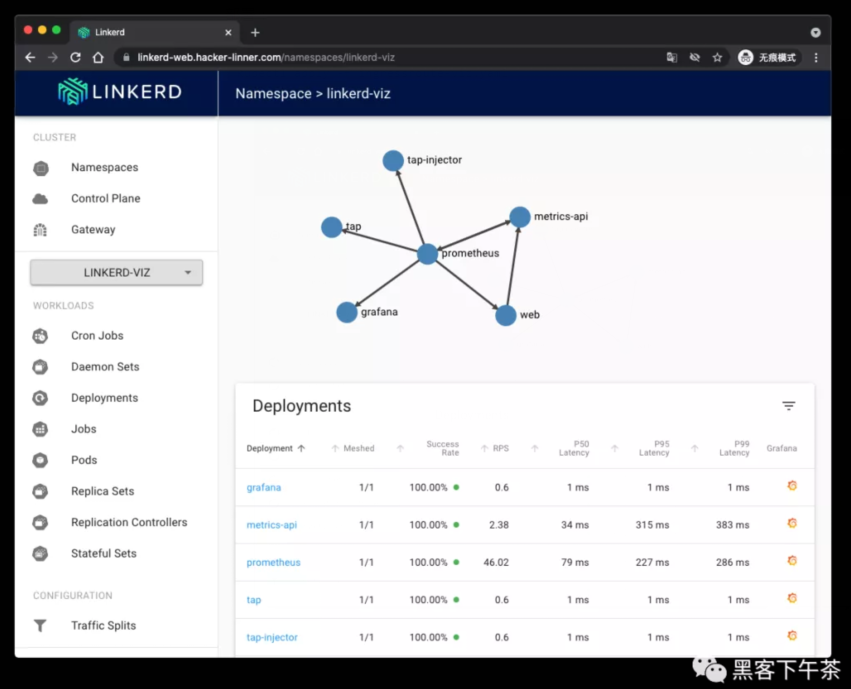
使用 Traefik Ingressroute 导出 linkerd-web 管理面板
关于 traefik v2 的部署,这里不做赘述。
使用 kustomize 对 linkerd viz 部署进行更新
我这里使用的域名是 linkerd-web.hacker-linner.com。
导出 yaml 档:
- linkerd viz install > linkerd-viz.yaml
打补丁,patch-linkerd-viz-web.yaml:
- apiVersion: apps/v1
- kind: Deployment
- metadata:
- annotations:
- linkerd.io/created-by: linkerd/helm edge-21.6.1
- labels:
- linkerd.io/extension: viz
- app.kubernetes.io/name: web
- app.kubernetes.io/part-of: Linkerd
- app.kubernetes.io/version: edge-21.6.1
- component: web
- namespace: linkerd-viz
- name: web
- namespace: linkerd-viz
- spec:
- replicas: 1
- selector:
- matchLabels:
- linkerd.io/extension: viz
- component: web
- namespace: linkerd-viz
- template:
- metadata:
- annotations:
- linkerd.io/created-by: linkerd/helm edge-21.6.1
- labels:
- linkerd.io/extension: viz
- component: web
- namespace: linkerd-viz
- spec:
- nodeSelector:
- beta.kubernetes.io/os: linux
- containers:
- - args:
- - -linkerd-metrics-api-addr=metrics-api.linkerd-viz.svc.cluster.local:8085
- - -cluster-domain=cluster.local
- - -grafana-addr=grafana.linkerd-viz.svc.cluster.local:3000
- - -controller-namespace=linkerd
- - -viz-namespace=linkerd-viz
- - -log-level=info
- - -enforced-host=^(linkerd-web\.hacker-linner\.com|localhost|127\.0\.0\.1|web\.linkerd-viz\.svc\.cluster\.local|web\.linkerd-viz\.svc|\[::1\])(:\d+)?$
- image: cr.l5d.io/linkerd/web:edge-21.6.1
- imagePullPolicy: IfNotPresent
- livenessProbe:
- httpGet:
- path: /ping
- port: 9994
- initialDelaySeconds: 10
- name: web
- ports:
- - containerPort: 8084
- name: http
- - containerPort: 9994
- name: admin-http
- readinessProbe:
- failureThreshold: 7
- httpGet:
- path: /ready
- port: 9994
- resources:
- securityContext:
- runAsUser: 2103
- serviceAccountName: web
更新 kustomization.yaml:
- resources:
- - linkerd-viz.yaml
- - linkerd-multicluster.yaml
- patchesStrategicMerge:
- - patch-linkerd-viz-web.yaml
- - patch-linkerd-multicluster.yaml
重新部署
- kustomize build . | kubectl apply -f -
设置 Ingressroute & Basic Auth
- ingressroute-viz.yaml
- apiVersion: v1
- kind: Secret
- metadata:
- name: linkerd-authsecret
- namespace: linkerd-viz
- type: Opaque
- stringData:
- users: # 这里使用 htpasswd -nb 进行设置
- ---
- apiVersion: traefik.containo.us/v1alpha1
- kind: Middleware
- metadata:
- name: linkerd-basic-auth
- namespace: linkerd-viz
- spec:
- basicAuth:
- secret: linkerd-authsecret
- ---
- apiVersion: traefik.containo.us/v1alpha1
- kind: Middleware
- metadata:
- name: l5d-header-middleware
- namespace: linkerd-viz
- spec:
- headers:
- customRequestHeaders:
- l5d-dst-override: "web.linkerd-viz.svc.cluster.local:8084"
- ---
- apiVersion: traefik.containo.us/v1alpha1
- kind: IngressRoute
- metadata:
- name: linkerd-web-ingress-route
- namespace: linkerd-viz
- spec:
- entryPoints:
- - websecure
- tls:
- secretName: hacker-linner-cert-tls
- routes:
- - match: Host(`linkerd-web.hacker-linner.com`)
- kind: Rule
- services:
- - name: web
- port: 8084
- middlewares:
- - name: l5d-header-middleware
- - name: linkerd-basic-auth
部署:
- kubectl apply -f ingressroute-viz.yaml
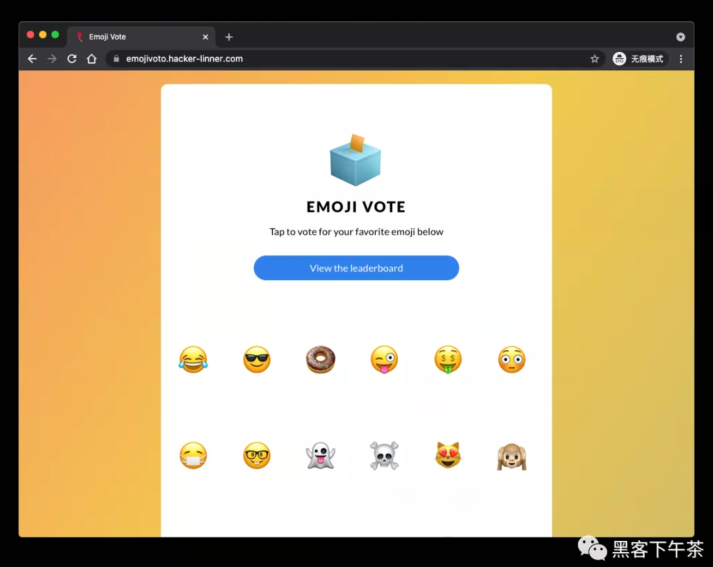
部署 emojivoto
运行如下命令:
- curl -sL https://run.linkerd.io/emojivoto.yml \
- | kubectl apply -f
审查部署:
- kubectl get po -n emojivoto
- # OR
- # docker pull docker.l5d.io/buoyantio/emojivoto-emoji-svc:v11
- # docker pull docker.l5d.io/buoyantio/emojivoto-web:v11
- # docker pull docker.l5d.io/buoyantio/emojivoto-voting-svc:v11
- emoji-6b776684f5-nnflg 1/1 Running 0 6m4s
- vote-bot-64695c4dc6-jn8ln 1/1 Running 0 6m4s
- voting-7778876bdb-kdvsx 1/1 Running 0 6m4s
- web-6f8d774656-9dsw7 1/1 Running 0 6m4s
设置 Ingressroute
这里是:https://emojivoto.hacker-linner.com
- emojivoto-ingressroute.yaml
- apiVersion: traefik.containo.us/v1alpha1
- kind: IngressRoute
- metadata:
- name: emojivoto-web-ingress-route
- namespace: emojivoto
- spec:
- entryPoints:
- - websecure
- tls:
- secretName: hacker-linner-cert-tls
- routes:
- - match: Host(`emojivoto.hacker-linner.com`)
- kind: Rule
- services:
- - name: web-svc
- port: 80
Service Mesh(Linkerd) 注入
添加 Linkerd 到 emojivoto:
- kubectl get -n emojivoto deploy -o yaml \
- | linkerd inject - \
- | kubectl apply -f -
审查一下是否一切正常:
- linkerd -n emojivoto check --proxy
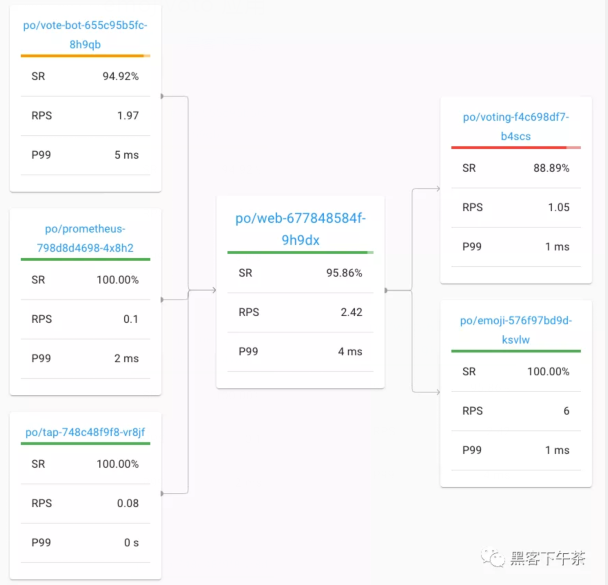
回到面板查看 emojivoto:

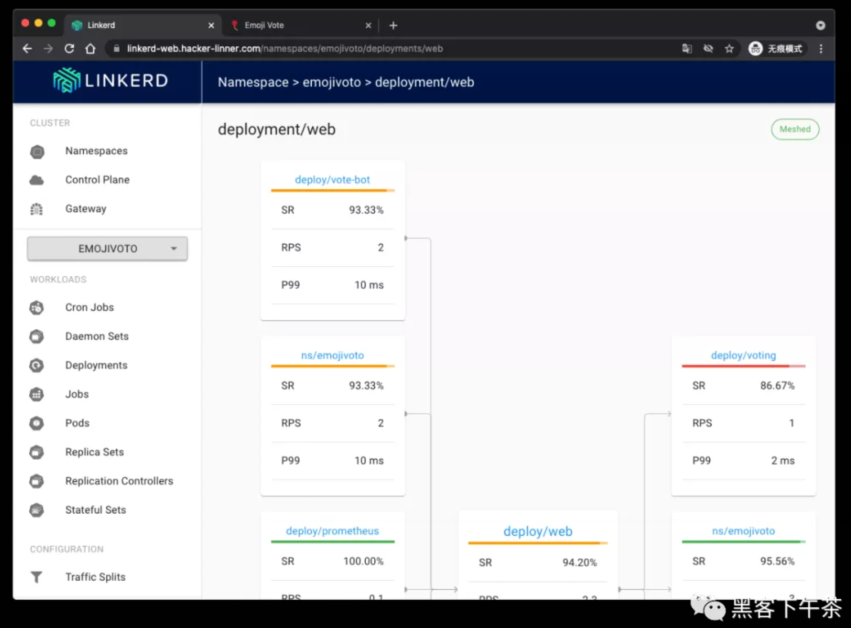
完美搞定,一切正常。
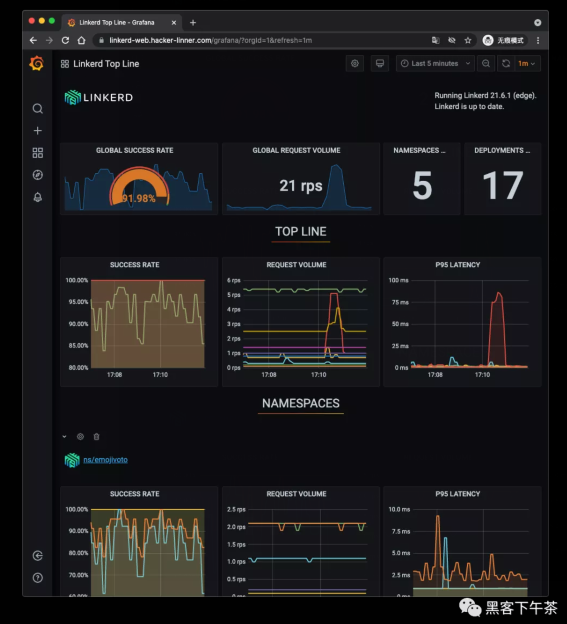
最后看一下 Grafana 面板:
Refs
- What's a service mesh? And why do I need one?
- https://buoyant.io/2020/10/12/what-is-a-service-mesh
- 快速上手 Linkerd v2 Service Mesh(服务网格)
- Getting Started
- https://linkerd.io/2.10/getting-started